# Auto-generate eCommerce Product Marketing Images
> Learn how to automate product marketing images generation using n8n and Orshot - from data source to beautiful branded marketing images in minutes
- **Author**: Rishi Mohan
- **Published**: 2025-08-06
- **Tags**: Automation, Templates, n8n, eCommerce
- **Read time**: 5 min read
- **URL**: https://orshot.com/blog/automate-ecommerce-product-images
---
Creating consistent, professional marketing visuals for your eCommerce products can be time-consuming and expensive. In this tutorial, we'll show you how to automate the entire process using n8n workflow automation and [Orshot's image generation API](https://orshot.com/solutions/image-generation-api)
**Relevant** → [Auto-generate eCommerce Banners](https://orshot.com/use-cases/t/auto-generate-e-commerce-images)
## We Will Use:
- [n8n](https://n8n.io) for the workflow setup
- Google Sheets for data source
- [Orshot](https://orshot.com/) for image generation from custom templates, you'll need to signup for an API key(free)
**Note that** n8n and Google Sheets are just for this tutorial,
in real workflow you can pull data from your database
and directly send it to Orshot's API for marketing image generation,
and then save that image or continue workflow however you want
## What You'll Build
By the end of this tutorial, you'll have an automated workflow that:
- Pulls product data from any source (Google Sheets, database, API)
- Generates professional marketing visuals using [Orshot templates](https://orshot.com/templates)
- Saves the generated images to your preferred storage (Google Sheets, Drive, S3, etc.)
- [Download n8n JSON file for the workflow](https://orshot.com/blog/automate-ecommerce-visuals/n8n-config.json) for quick setup
## Video Walkthrough
Here's a video walkthrough of the n8n workflow setup
## Step 1: Setting Up Your Data Source
The first step is configuring your data source. For this demo, we're using Google Sheets with product information, but this could be any data source like:
- Shopify product database
- WooCommerce API
- Airtable
- Custom database
- CSV files
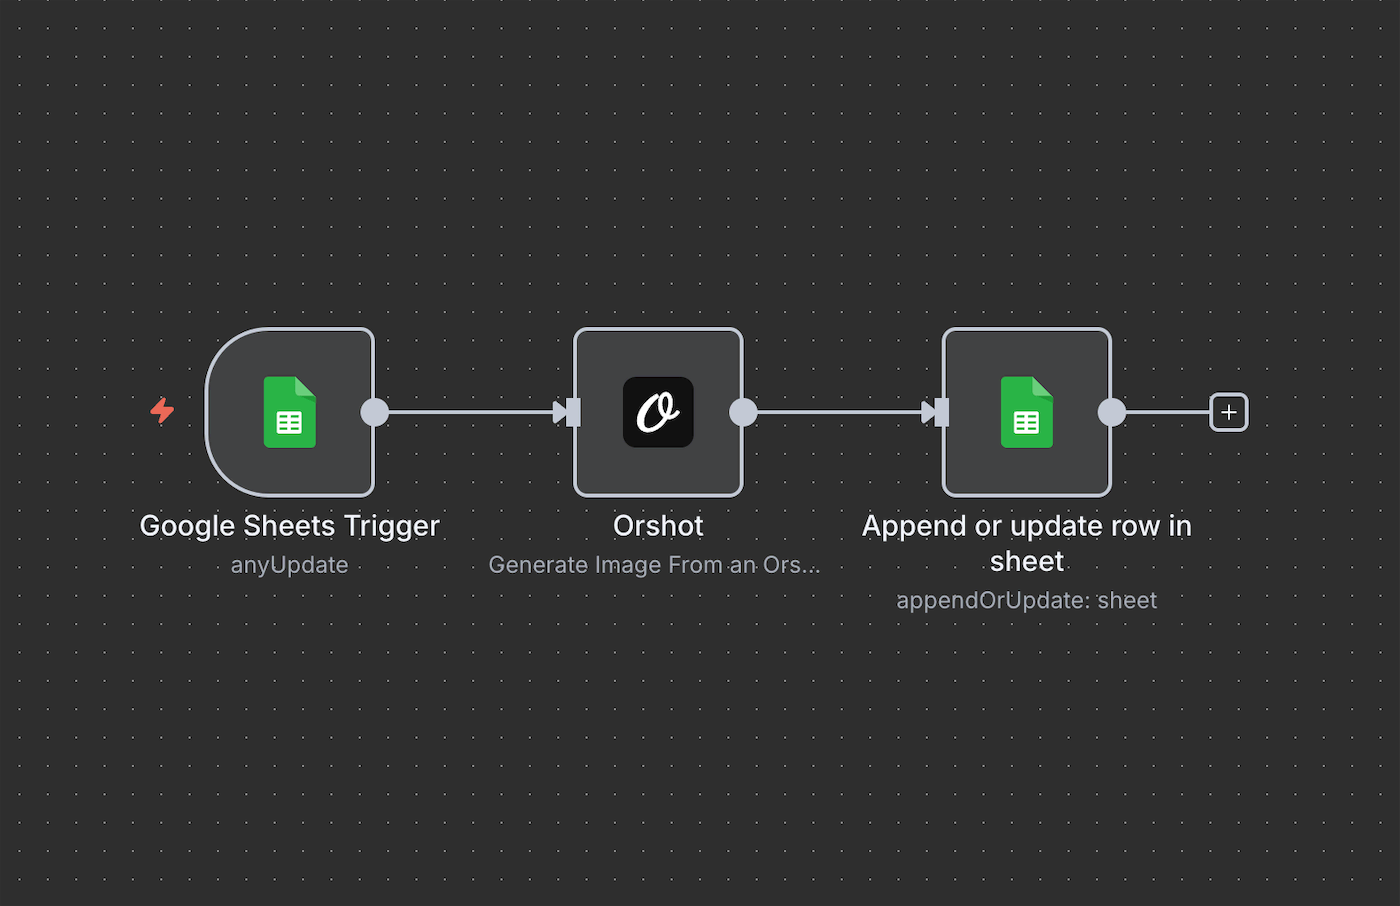
### Google Sheets Trigger Configuration
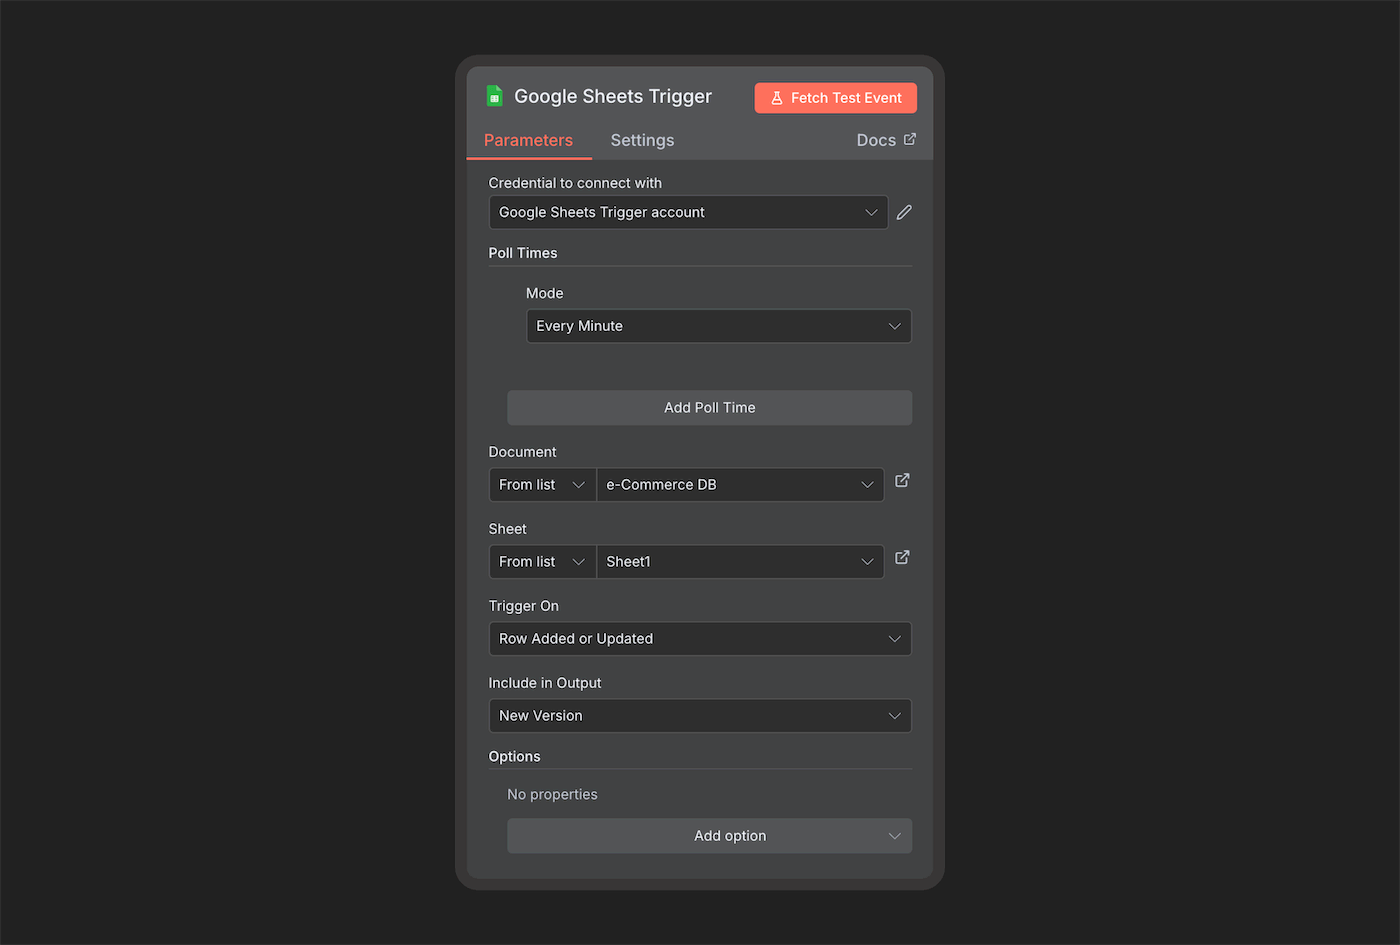
In your n8n workflow, add a **Google Sheets Trigger** node with the following settings:
- **Credential**: Connect your Google Sheets account
- **Document**: Select your eCommerce product database
- **Sheet**: Choose the sheet containing product data
- **Trigger On**: Row Added or Updated
- **Poll Times**: Set to monitor changes (e.g., Every Minute)
Your Google Sheets should contain columns like:
- Product Type
- Product Name
- Before Price
- Discount Price
- Currency
- Product Image URL
## Step 2: Generate Images with Orshot
This is where the magic happens. The Orshot node takes your product data and generates beautiful marketing visuals using pre-designed template
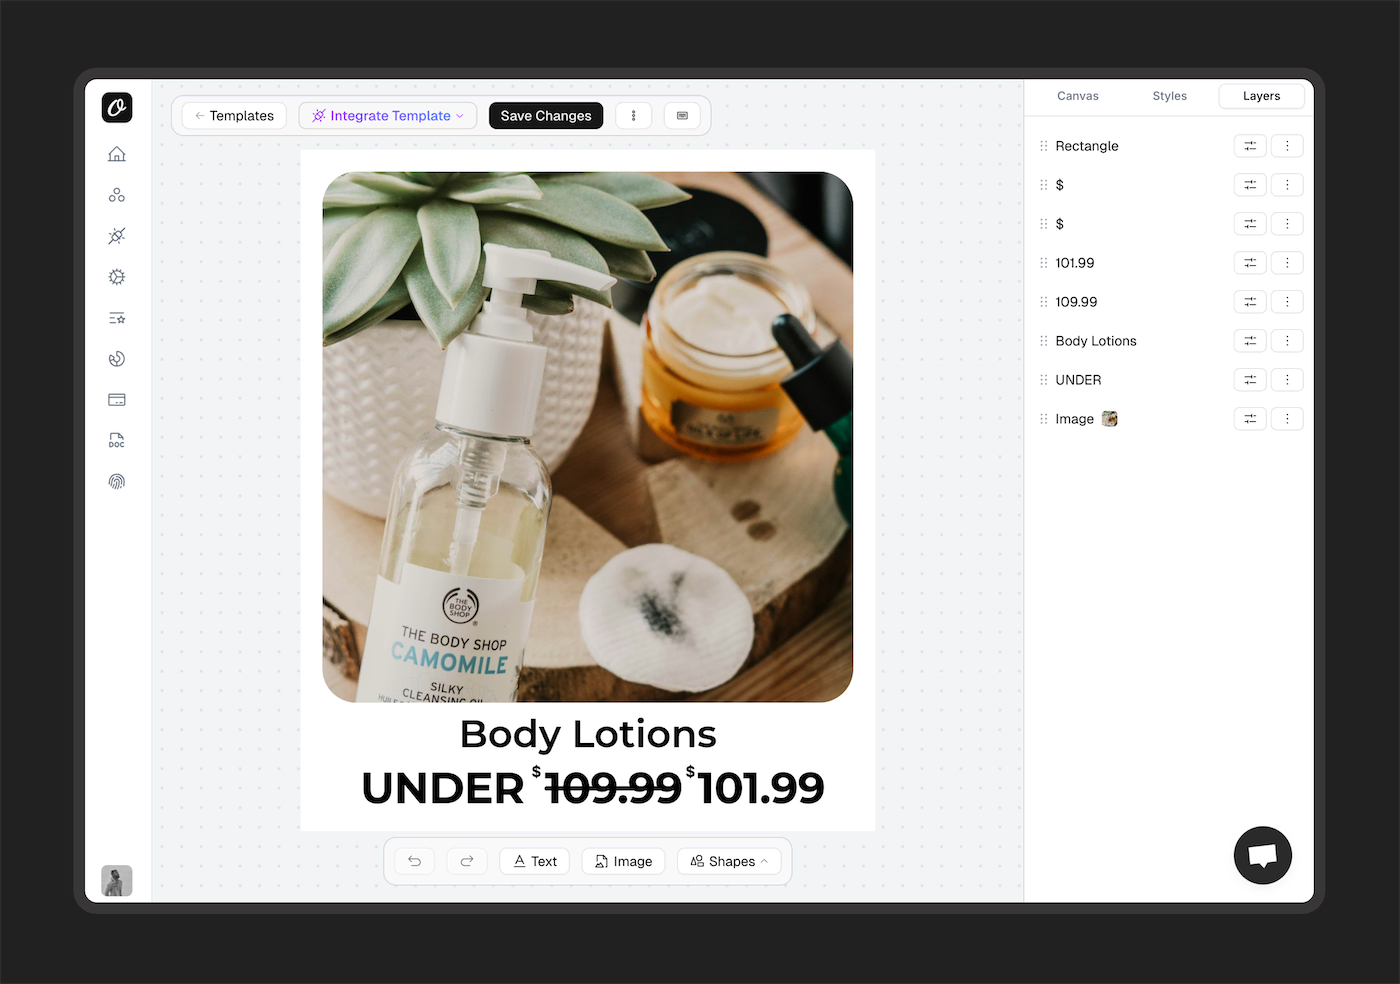
For this tutorial, we'll be using below [template in Orshot](https://orshot.com/templates/60). You can also start with design tools like Figma, Canva, or [explore free design alternatives](https://orshot.com/blog/free-canva-alternatives), then import them into Orshot for automation.
The image, text for before price, discounted price and
product type are parameterized so we can pass dynamic data to those elements
### Orshot Node Configuration
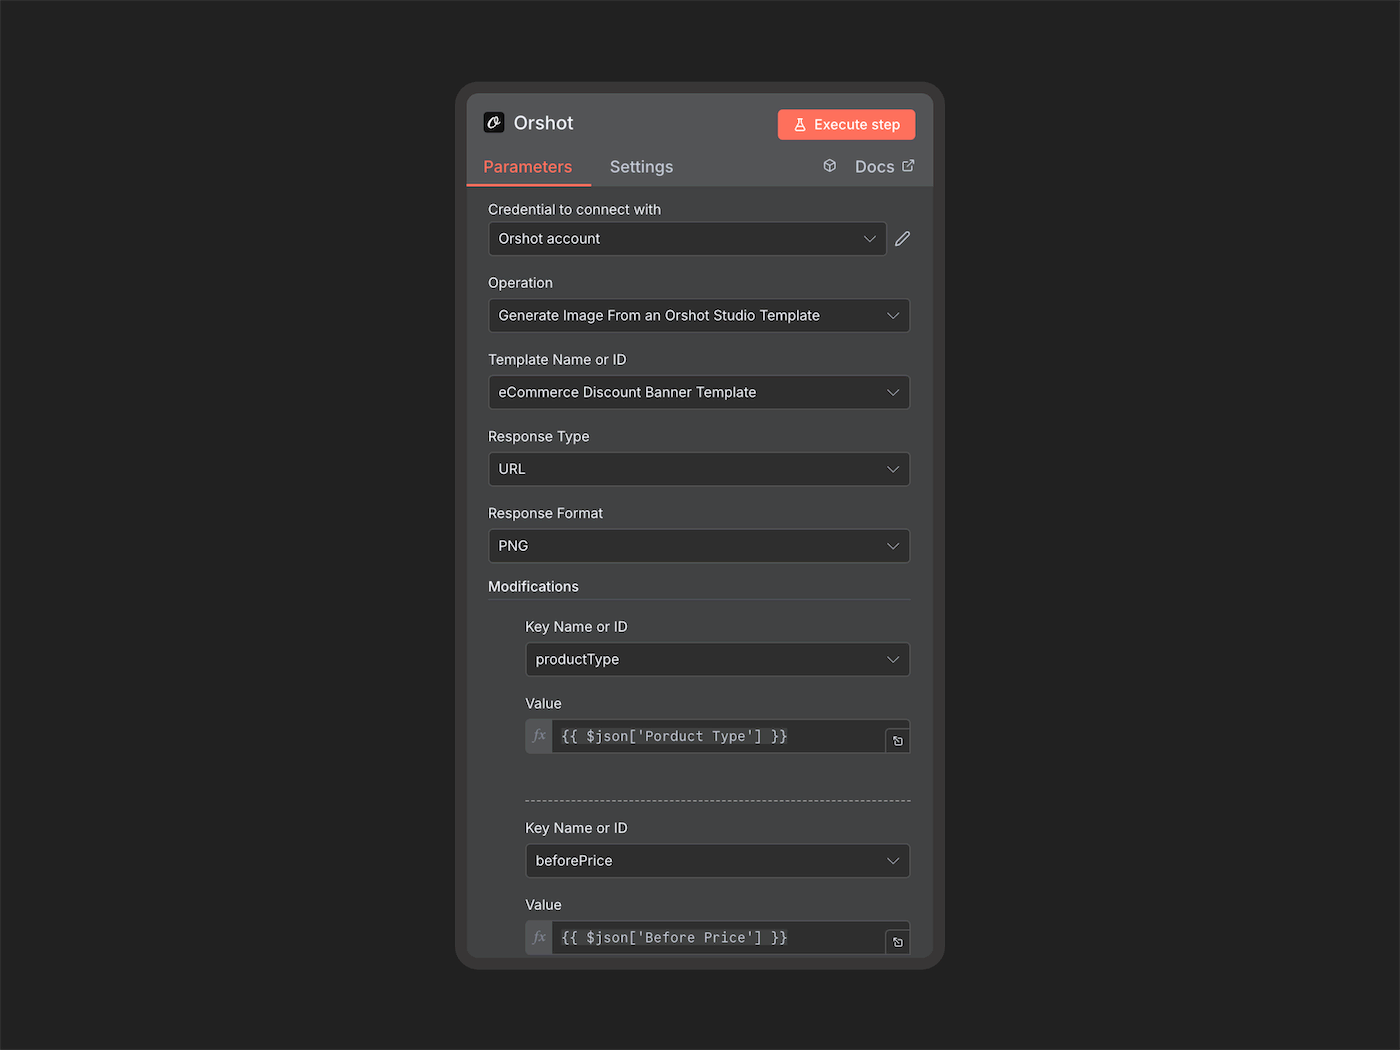
Add the **Orshot** node to your workflow and configure:
- **Credential**: Connect your Orshot account
- **Operation**: Generate Image From an Orshot Studio Template
- **Template**: Select "eCommerce Discount Banner Template" (or your custom template)
- **Response Type**: URL
- **Response Format**: PNG
### Data Mapping
Map your Google Sheets data to the Orshot template parameters:```javascript
// Product Type mapping
{
"productType": "{{ $json['Product_Type'] }}"
}
// Before Price mapping
{
"beforePrice": "{{ $json['Before_Price'] }}"
}
// Additional mappings for discount price, currency, product image, etc.
```The template will automatically generate a professional marketing visual with your product information, pricing, and branding.
## Step 3: Save Generated Images
After Orshot generates your marketing visual, you need to store it somewhere accessible. For this tutorial, we're saving back to Google Sheets, but you have many options:
### Google Sheets Storage (Demo)
- **Node**: Append or update row in Google Sheets
- **Operation**: Append or Update Row
- **Document**: Same eCommerce database
- **Values to Send**: Include the generated image URL
### Alternative Storage Options for Production:
**Google Drive**
- Automatically organize images in folders by product category
- Easy sharing and collaboration
**Amazon S3 / Cloudflare R2**
- Scalable cloud storage
- Perfect for high-volume eCommerce stores
- Cost-effective for large image libraries
**Direct Upload to Shopify/WooCommerce**
- Automatically add generated images to product listings
- Streamline your product management workflow
## Using Orshot REST API Directly
If you prefer to integrate Orshot directly into your application, you can use our REST API as show below. You can also [generate dynamic images via dynamic URLs](https://orshot.com/blog/programmatic-seo-tools) without any programmatic involvement```javascript
await fetch("https://api.orshot.com/v1/studio/render", {
method: "POST",
headers: {
"Content-Type": "application/json",
Authorization: "Bearer ",
},
body: JSON.stringify({
templateId: "",
modifications: {
canvasBackgroundColor: "#FFFFFF",
productType: "Body Lotions",
beforePrice: "109.99",
discountPrice: "101.99",
currency: "$",
productImageUrl: "https://images.unsplash.com/photo-15...",
},
response: {
type: "url",
format: "png",
scale: 1,
},
}),
});
```This approach gives you maximum flexibility and can be integrated into any application or custom workflow
## Benefits of This Automation
- **Time Savings**: Generate hundreds of marketing visuals in minutes instead of hours
- **Consistency**: Maintain brand consistency across all product marketing
- **Scalability**: Easily handle large product catalogs
- **Cost-Effective**: Reduce design costs and resource requirements
- **Real-time Updates**: Automatically generate new visuals when products or prices change
## Use Cases Beyond eCommerce
This automation pattern works for many scenarios:
- Social media content generation — use [Social Publish](https://orshot.com/docs/publish/introduction) to auto-post generated product images to Instagram, Pinterest, TikTok, and 10+ platforms
- Email marketing campaigns
- Product catalog updates
- Seasonal promotions
AI combined with automation is a powerful combination.
Specially in marketing where a lot of work can be mannual,
apps like Orshot with AI and automation features
can help you reduce your team's efforts, scale production speed
and quality
**Related →** [10 Best Tools to Automate Content Creation](https://orshot.com/blog/automated-content-creation-tools) | [Best Social Media Automation Tools](https://orshot.com/blog/social-media-automation-tools)