# Flowing Content
> Let text automatically overflow across multiple pages — perfect for articles, reports, and long-form documents
- **URL**: https://orshot.com/docs/orshot-studio/flowing-content
---
Flowing content lets a text element automatically split across as many pages as it needs. Write your full article, report, or document body into a single text element, set it to **Flow** mode, and Orshot handles the page breaks for you.
This is different from regular multi-page templates where you manually design each page. With flow, one page becomes the source, and overflow pages are created automatically based on how much text there is.
## When to Use Flow
- **Long-form documents** — articles, reports, whitepapers
- **Certificates with variable text** — course descriptions that vary in length
- **Invoices with many line items** — text that might be 1 page or 10
- **Any template where content length is unpredictable**
## How it Works
## Setting Up Flow
### 1. Create your source page
Design your template's first page as usual — add a header, logo, footer, body text, or whatever your layout needs.
### 2. Set a text element to Flow mode
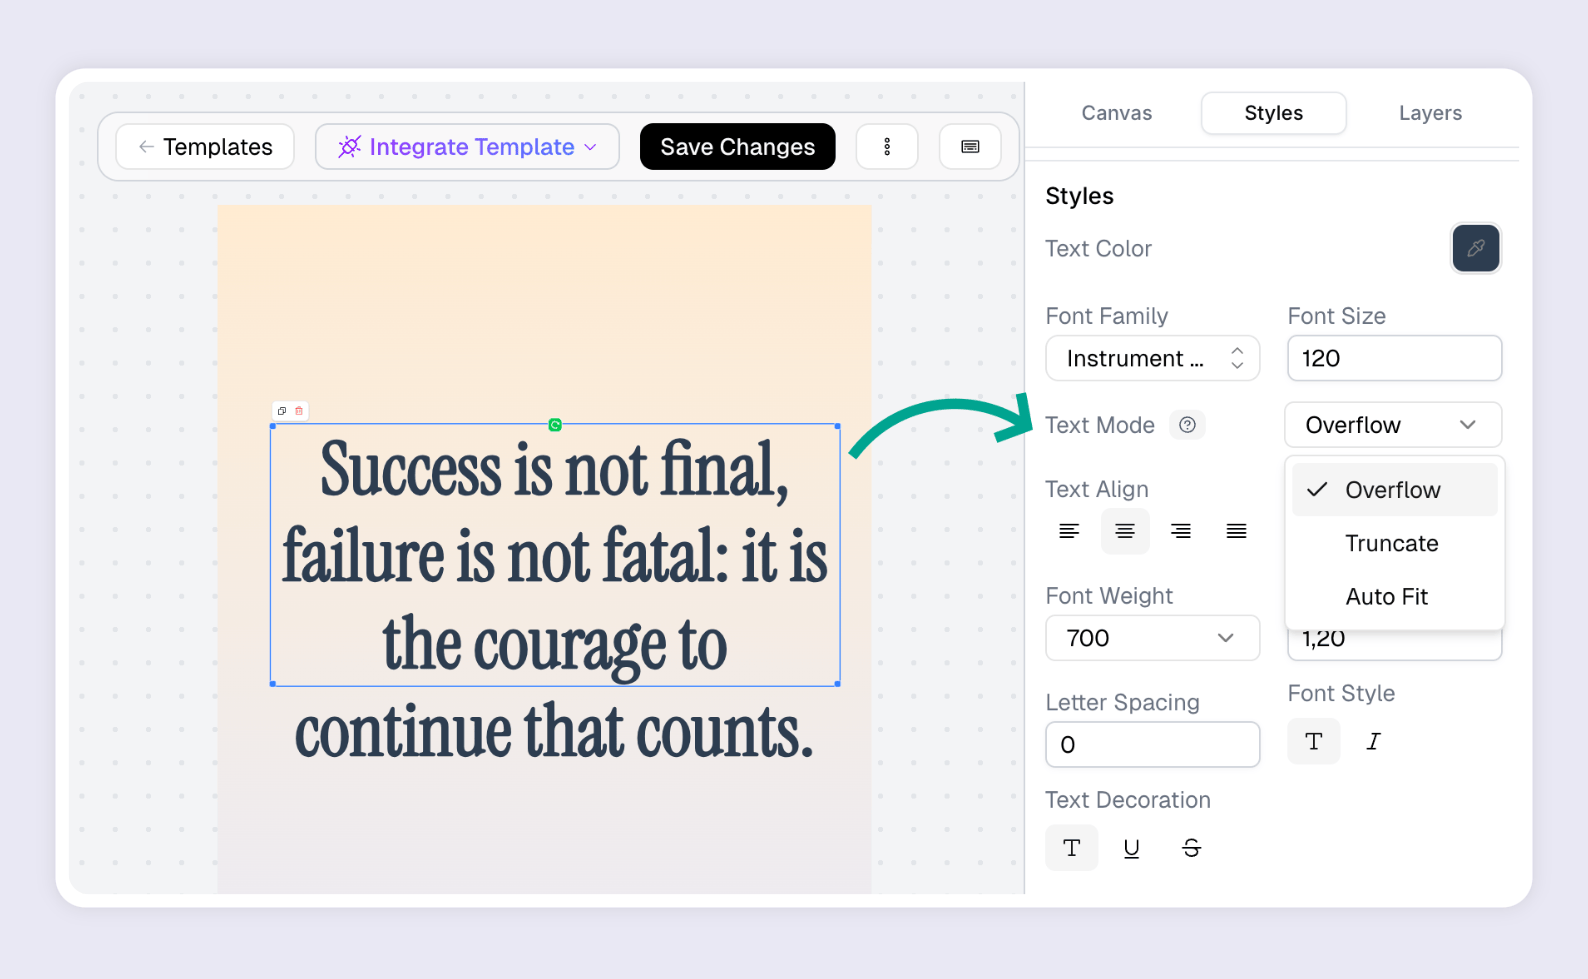
Select the text element that should overflow, open the **Styles** panel, and change **Text Autofit** to **Flow**.
This element's content will now flow across pages. All other elements on the page stay on page 1 only (unless you mark them as repeating).
### 3. Mark repeating elements
Any element you want on every page (headers, footers, logos, page numbers) — enable **Repeat on overflow pages** in the element settings.
These elements appear in the same position on every overflow page, and the flow text automatically avoids overlapping with them.
### 4. Add page numbers (optional)
Use these placeholders in any text element to show page numbers:
- `}` — current page number (1, 2, 3...)
- `}` — total number of pages
For example, a footer text like `Page } of }` becomes "Page 2 of 5" on the second page of a five-page document.
## How Pages Are Generated
When you render a template with flow text:
1. **Page 1** renders exactly as you designed it — all elements in their original positions
2. If the flow text doesn't fit on page 1, **overflow pages** are created automatically
3. Each overflow page includes repeating elements plus the next chunk of text
4. Text splits at line boundaries so words are never cut in half
The number of overflow pages depends on how much text there is and how much space is available on each page.
## Flow Zones
By default, flow text on overflow pages fills the space between repeating elements. If you need more control, you can define **flow zones** — custom regions where text should appear on overflow pages.
Each zone has a **Y position** (where the text starts from the top) and a **Height** (how tall the text area is). You can add multiple zones:
- **Zone 1** applies to the first overflow page (page 2)
- **Zone 2** applies to the second overflow page (page 3)
- **The last zone repeats** for all remaining pages
If you don't set any zones, overflow pages use the full available space between repeating elements — which works well for most layouts.
## Page Break Controls
Flow mode gives you control over how text splits between pages:
- **Break at** — choose `line` (default), `word`, or `char`. Line-level breaks prevent splitting in the middle of a line.
- **Min lines before break** — minimum lines that must remain at the bottom of a page before breaking (prevents orphans). Default: 2.
- **Min lines after break** — minimum lines that must appear at the top of the next page (prevents widows). Default: 2.
## Using Flow with the API
When rendering a flow template via API, the request is the same as any other template. Just pass your text content in `modifications`:```json
{
"templateId": "",
"modifications": {
"body": "Your long article text goes here. It can be as long as you need — the API will generate as many pages as required to fit all the content."
},
"response": {
"format": "pdf",
"type": "url"
}
}
```### Multi-page response
When flow text creates multiple pages, the response includes all pages:```json
{
"data": [
{
"page": 1,
"pageId": "abc-123",
"content": "https://storage.orshot.com/.../page_1.png"
},
{
"page": 2,
"content": "https://storage.orshot.com/.../page_2.png",
"sourcePageNumber": 1,
"flowPage": 1
},
{
"page": 3,
"content": "https://storage.orshot.com/.../page_3.png",
"sourcePageNumber": 1,
"flowPage": 2
}
],
"totalPages": 3,
"flowTotalPages": 2,
"format": "png",
"type": "url"
}
```- `sourcePageNumber` — which template page this overflow came from
- `flowPage` — which overflow page this is (1 = first overflow, 2 = second, etc.)
- `flowTotalPages` — total number of overflow pages generated
- `totalPages` — total pages in the output (source + overflow)
### Rendering specific pages
Use `includePages` to render only certain pages from the flow output:```json
{
"response": {
"format": "png",
"type": "url",
"includePages": [1, 3]
}
}
```### PDF output
Flow templates work great as PDFs — all overflow pages are combined into a single document automatically. You can use `pdfOptions.rangeFrom` and `pdfOptions.rangeTo` to select a page range.
## Rich Text in Flow
Flow text supports rich text (HTML). You can use inline formatting like ``, ``, `` with styles, and the formatting is preserved correctly across page breaks — tags are properly closed and reopened at each split point.
## Render Costs
Each page in the output counts as a separate render. A flow template that produces 5 pages costs 5 image renders (or 5 PDF page renders). Use `includePages` to render fewer pages and reduce costs.
## Tips
- **Keep page 1 clean** — the more space you leave for the flow text on page 1, the fewer overflow pages you'll need
- **Test with varying content lengths** — try short and long text to make sure your layout works at any length
- **Use repeating elements for consistency** — headers, footers, and watermarks should repeat so every page looks complete
- **Combine with page numbers** — `}` of `}` in a repeating footer gives readers context on any page
## Related
- [Text Autofit](https://orshot.com/docs/orshot-studio/text-modes) — Fit, Truncate, and Overflow modes
- [Multi-Page Images](https://orshot.com/docs/image-generation/multi-page-images) — Rendering multi-page templates as images
- [Multi-Page PDFs](https://orshot.com/docs/pdf-generation/multi-page-pdfs) — Generating PDF documents
- [Render from Studio Template](https://orshot.com/docs/api-reference/render-from-studio-template) — Full API reference
 This element's content will now flow across pages. All other elements on the page stay on page 1 only (unless you mark them as repeating).
### 3. Mark repeating elements
Any element you want on every page (headers, footers, logos, page numbers) — enable **Repeat on overflow pages** in the element settings.
These elements appear in the same position on every overflow page, and the flow text automatically avoids overlapping with them.
### 4. Add page numbers (optional)
Use these placeholders in any text element to show page numbers:
- `}` — current page number (1, 2, 3...)
- `}` — total number of pages
For example, a footer text like `Page } of }` becomes "Page 2 of 5" on the second page of a five-page document.
## How Pages Are Generated
When you render a template with flow text:
1. **Page 1** renders exactly as you designed it — all elements in their original positions
2. If the flow text doesn't fit on page 1, **overflow pages** are created automatically
3. Each overflow page includes repeating elements plus the next chunk of text
4. Text splits at line boundaries so words are never cut in half
The number of overflow pages depends on how much text there is and how much space is available on each page.
## Flow Zones
By default, flow text on overflow pages fills the space between repeating elements. If you need more control, you can define **flow zones** — custom regions where text should appear on overflow pages.
Each zone has a **Y position** (where the text starts from the top) and a **Height** (how tall the text area is). You can add multiple zones:
- **Zone 1** applies to the first overflow page (page 2)
- **Zone 2** applies to the second overflow page (page 3)
- **The last zone repeats** for all remaining pages
If you don't set any zones, overflow pages use the full available space between repeating elements — which works well for most layouts.
## Page Break Controls
Flow mode gives you control over how text splits between pages:
- **Break at** — choose `line` (default), `word`, or `char`. Line-level breaks prevent splitting in the middle of a line.
- **Min lines before break** — minimum lines that must remain at the bottom of a page before breaking (prevents orphans). Default: 2.
- **Min lines after break** — minimum lines that must appear at the top of the next page (prevents widows). Default: 2.
## Using Flow with the API
When rendering a flow template via API, the request is the same as any other template. Just pass your text content in `modifications`:```json
{
"templateId": "
This element's content will now flow across pages. All other elements on the page stay on page 1 only (unless you mark them as repeating).
### 3. Mark repeating elements
Any element you want on every page (headers, footers, logos, page numbers) — enable **Repeat on overflow pages** in the element settings.
These elements appear in the same position on every overflow page, and the flow text automatically avoids overlapping with them.
### 4. Add page numbers (optional)
Use these placeholders in any text element to show page numbers:
- `}` — current page number (1, 2, 3...)
- `}` — total number of pages
For example, a footer text like `Page } of }` becomes "Page 2 of 5" on the second page of a five-page document.
## How Pages Are Generated
When you render a template with flow text:
1. **Page 1** renders exactly as you designed it — all elements in their original positions
2. If the flow text doesn't fit on page 1, **overflow pages** are created automatically
3. Each overflow page includes repeating elements plus the next chunk of text
4. Text splits at line boundaries so words are never cut in half
The number of overflow pages depends on how much text there is and how much space is available on each page.
## Flow Zones
By default, flow text on overflow pages fills the space between repeating elements. If you need more control, you can define **flow zones** — custom regions where text should appear on overflow pages.
Each zone has a **Y position** (where the text starts from the top) and a **Height** (how tall the text area is). You can add multiple zones:
- **Zone 1** applies to the first overflow page (page 2)
- **Zone 2** applies to the second overflow page (page 3)
- **The last zone repeats** for all remaining pages
If you don't set any zones, overflow pages use the full available space between repeating elements — which works well for most layouts.
## Page Break Controls
Flow mode gives you control over how text splits between pages:
- **Break at** — choose `line` (default), `word`, or `char`. Line-level breaks prevent splitting in the middle of a line.
- **Min lines before break** — minimum lines that must remain at the bottom of a page before breaking (prevents orphans). Default: 2.
- **Min lines after break** — minimum lines that must appear at the top of the next page (prevents widows). Default: 2.
## Using Flow with the API
When rendering a flow template via API, the request is the same as any other template. Just pass your text content in `modifications`:```json
{
"templateId": "