Webhooks
Trigger Images and PDF generation from forms, automation tools, or any HTTP client
Webhooks allow you to automatically generate images and PDFs when events occur in external services like Typeform, Tally, Zapier, Make, n8n, or your own backend. Instead of making API calls with an API key, you use a unique webhook URL that handles authentication automatically.
How It Works#
- Create a webhook for your Studio template
- Configure field mappings to connect incoming data to template modifications
- Point your form or service to the webhook URL
- When triggered, Orshot generates an image and returns it in your chosen format
Setting Up Webhooks#
1. Create a Webhook#
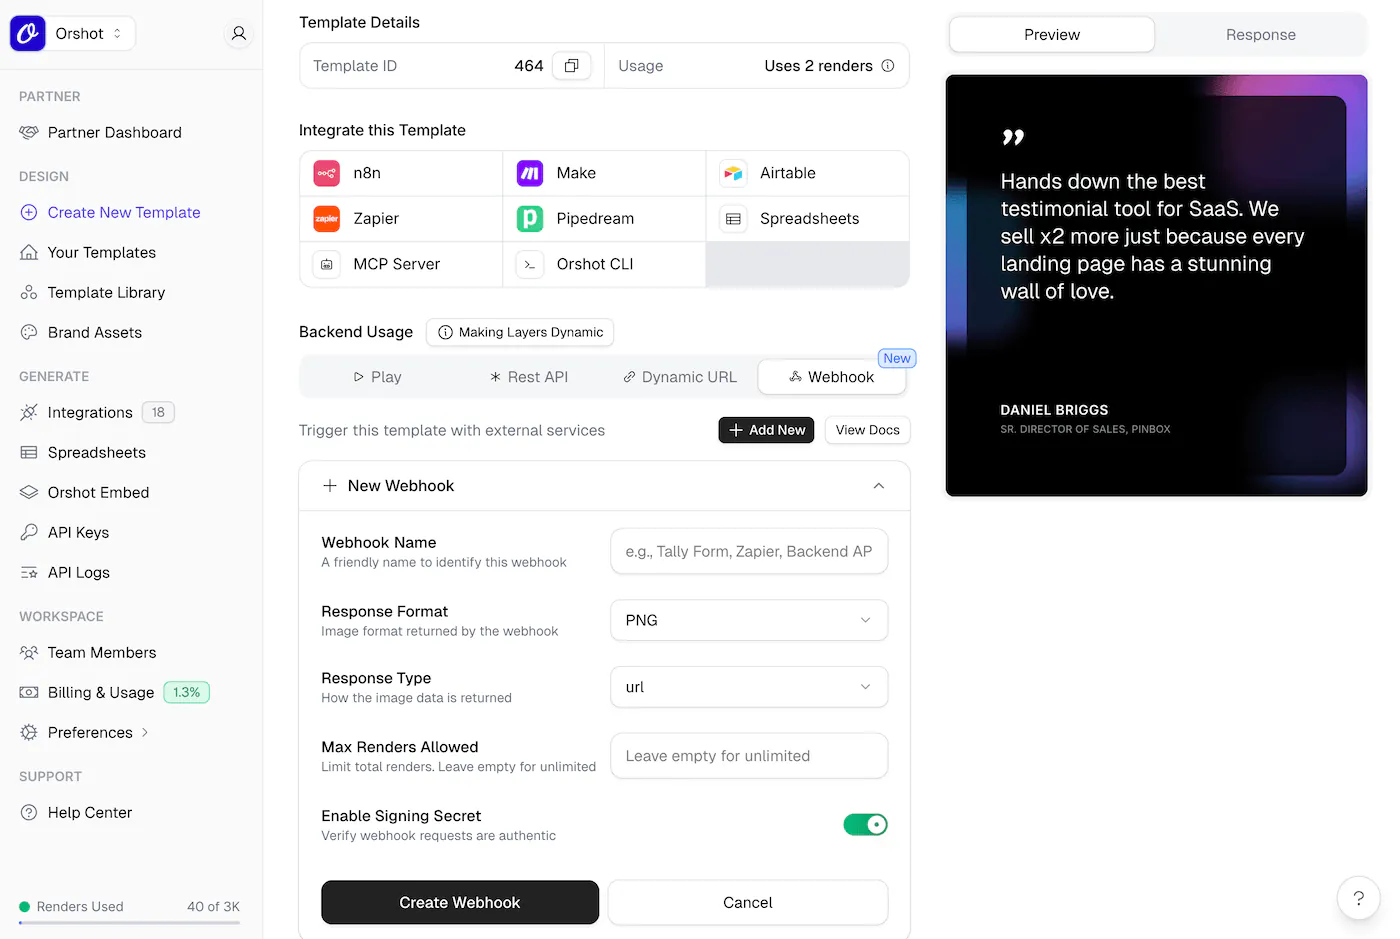
Navigate to your Studio template's playground and go to the Webhooks tab. Click Add New to create a webhook.
Configure the following options:
| Option | Description |
|---|---|
| Webhook Name | A friendly name to identify this webhook (e.g., "Tally Form", "Zapier") |
| Response Format | Image format: PNG, JPG, JPEG, WebP, AVIF, or PDF |
| Response Type | How the image is returned: url, base64, or binary |
| Max Renders | Limit total renders (leave empty for unlimited) |
| Signing Secret | Enable to verify webhook requests are authentic |
2. Get Your Webhook URL#
After creating the webhook, copy the Webhook URL:
https://api.orshot.com/v1/studio/webhook/wh_yourWebhookIdUse this URL as the webhook endpoint in your form builder or automation tool.
3. Configure Field Mappings#
Field mappings connect incoming webhook data to your template's dynamic fields.
Auto-detection: Trigger the webhook once from your form or service. Orshot automatically detects available fields from the payload and shows them in the Field Mappings section.
Manual mapping: Select which incoming field maps to each template modification using the dropdowns.
Example mapping:
name→page1@headingemail→page1@subheadingavatar_url→page1@profileImage
Signature Verification#
For production use, enable Signing Secret to verify that webhook requests actually come from your configured service.
How to Use#
- Copy the Signing Secret from your webhook settings in Orshot
- Paste it into your form builder's webhook signing configuration
- Orshot will reject requests with invalid or missing signatures
Orshot automatically detects and verifies signatures from popular services like Typeform, Tally, GitHub, Stripe, Slack, and any service using standard SHA256 HMAC signatures.
Usage Examples#
Typeform#
- In Typeform, go to Connect → Webhooks
- Add your Orshot webhook URL
- (Optional) Add the signing secret for verification
- Submit a test response to detect fields
- Map Typeform fields to template modifications in Orshot
Tally#
- In your Tally form, go to Integrations → Webhooks
- Paste your Orshot webhook URL
- Submit a test response
- Configure field mappings in Orshot
Zapier / Make / n8n#
- Add a Webhook action in your automation
- Set method to
POST - Use your Orshot webhook URL
- Send a JSON body with your field values:
{
  "name": "John Doe",
  "title": "Software Engineer",
  "avatar": "https://example.com/photo.jpg"
}Response#
The webhook returns the generated image based on your configured response type.
Single Page Template#
URL Response (default):
{
  "data": {
    "content": "https://storage.orshot.com/cloud/w-123/renders/images/abc123.png",
    "type": "url",
    "format": "png",
    "responseTime": "1234.56ms"
  }
}
Base64 Response:
{
  "data": {
    "content": "data:image/png;base64,iVBORw0KGgo...",
    "type": "base64",
    "format": "png",
    "responseTime": "1234.56ms"
  }
}
Binary Response: Returns the raw image file directly with appropriate content-type headers.
Multi-Page Template#
For multi-page templates, the response includes an array of pages:
URL Response:
{
  "data": [
    {
      "page": 1,
      "pageId": "a1b2c3d4-5e6f-7890-abcd-ef1234567890",
      "content": "https://storage.orshot.com/cloud/w-123/renders/images/page1.png"
    },
    {
      "page": 2,
      "pageId": "b2c3d4e5-6f78-9012-bcde-f23456789012",
      "content": "https://storage.orshot.com/cloud/w-123/renders/images/page2.png"
    },
    {
      "page": 3,
      "pageId": "c3d4e5f6-7890-1234-cdef-345678901234",
      "content": "https://storage.orshot.com/cloud/w-123/renders/images/page3.png"
    }
  ],
  "format": "png",
  "type": "url",
  "responseTime": "3456.78ms",
  "totalPages": 3,
  "renderedPages": 3
}
Base64 Response:
{
  "data": [
    { "page": 1, "pageId": "a1b2c3d4-5e6f-7890-abcd-ef1234567890", "content": "data:image/png;base64,iVBORw0KGgo..." },
    { "page": 2, "pageId": "b2c3d4e5-6f78-9012-bcde-f23456789012", "content": "data:image/png;base64,iVBORw0KGgo..." },
    { "page": 3, "pageId": "c3d4e5f6-7890-1234-cdef-345678901234", "content": "data:image/png;base64,iVBORw0KGgo..." }
  ],
  "format": "png",
  "type": "base64",
  "responseTime": "3456.78ms",
  "totalPages": 3,
  "renderedPages": 3
}
PDF Response#
For PDF format, all pages are merged into a single file:
{
  "data": {
    "content": "https://storage.orshot.com/cloud/w-123/renders/images/document.pdf",
    "type": "url",
    "format": "pdf",
    "responseTime": "2345.67ms"
  }
}
Managing Webhooks#
- Enable/Disable: Toggle webhooks on or off without deleting them
- Reset Secret: Generate a new signing secret (invalidates existing integrations)
- Clear Fields: Re-detect fields by clearing the stored payload
- Delete: Remove the webhook entirely
Need Help?#
Contact support at hi@orshot.com or use the chat button in your Orshot dashboard for assistance.
Ready to automate?
Start rendering images, PDFs and videos from your templates in under 2 minutes. Free plan, no credit card.
Get your API key- Image, PDF and video generation via API
- Visual editor with AI and smart layouts
- Zapier, Make, MCP and 50+ integrations
- White-label embed for your own app
- 30 free credits — no credit card required