TL;DR: Most n8n marketing automation guides stop at "send a Slack message." This one goes end-to-end: a new row of data → a branded image and a video → auto-posted to Instagram and LinkedIn. n8n moves the data; Orshot handles both the creation and the posting — so one tool does the work of a design app, a video editor, and a social scheduler.
📥 Download the n8n workflow (JSON) — import it into n8n and follow along.
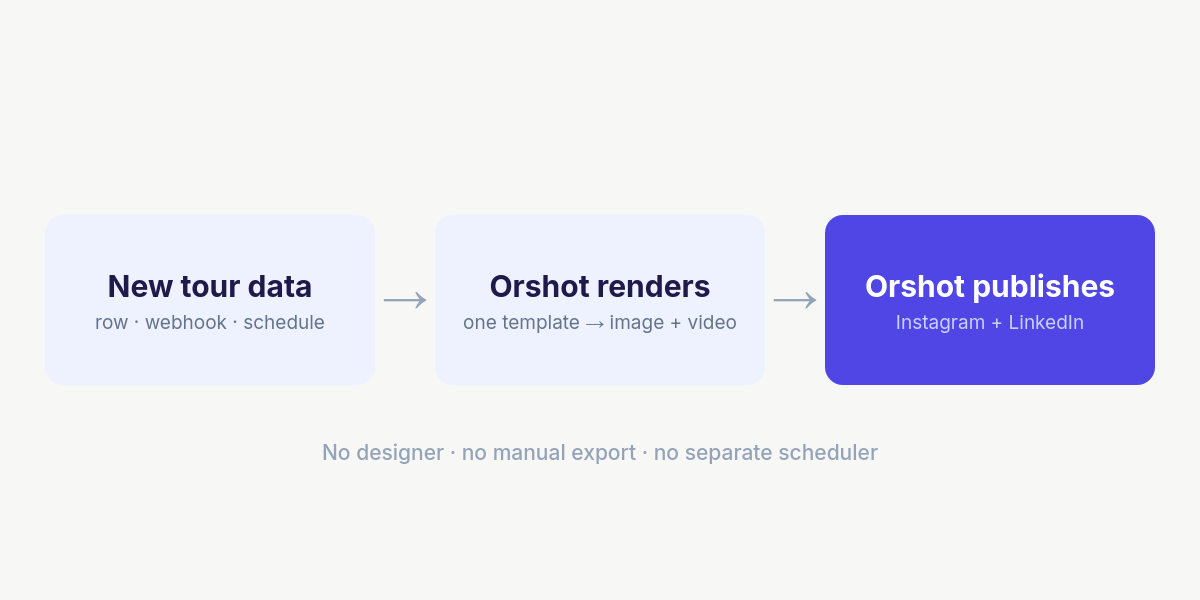
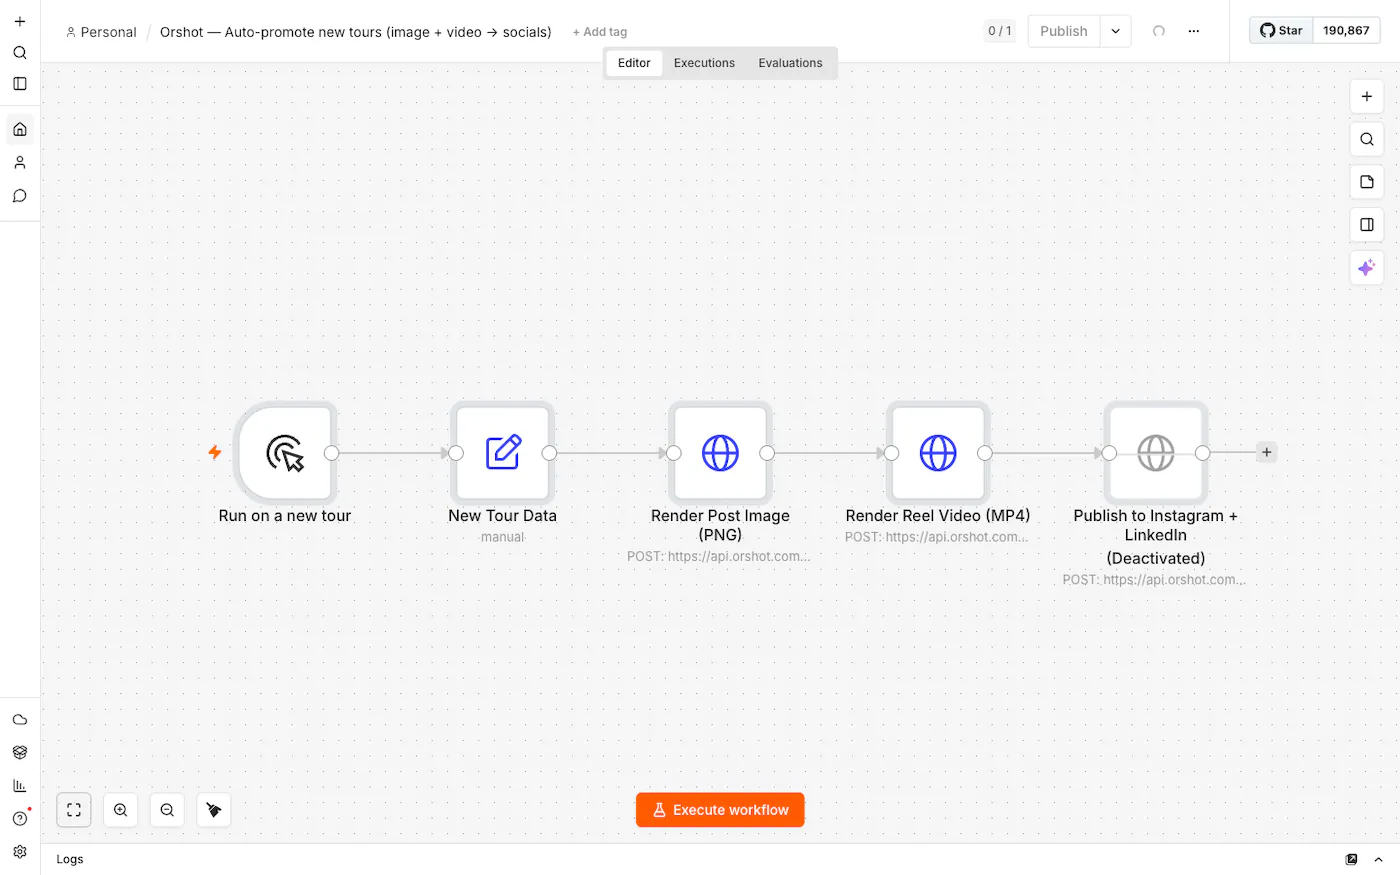
What we're building
Take a travel company. Every time they add a new tour, they want a polished Instagram post and a short Reel-style video out the door, on both Instagram and LinkedIn, without anyone opening a design tool. Same pattern works for a SaaS shipping a feature, a store launching a product, or an events team announcing a webinar — anything where new data should become on-brand content.
The pipeline, at a glance:
Here's the actual output from one row of tour data — the same template produces both the static post and the animated version:
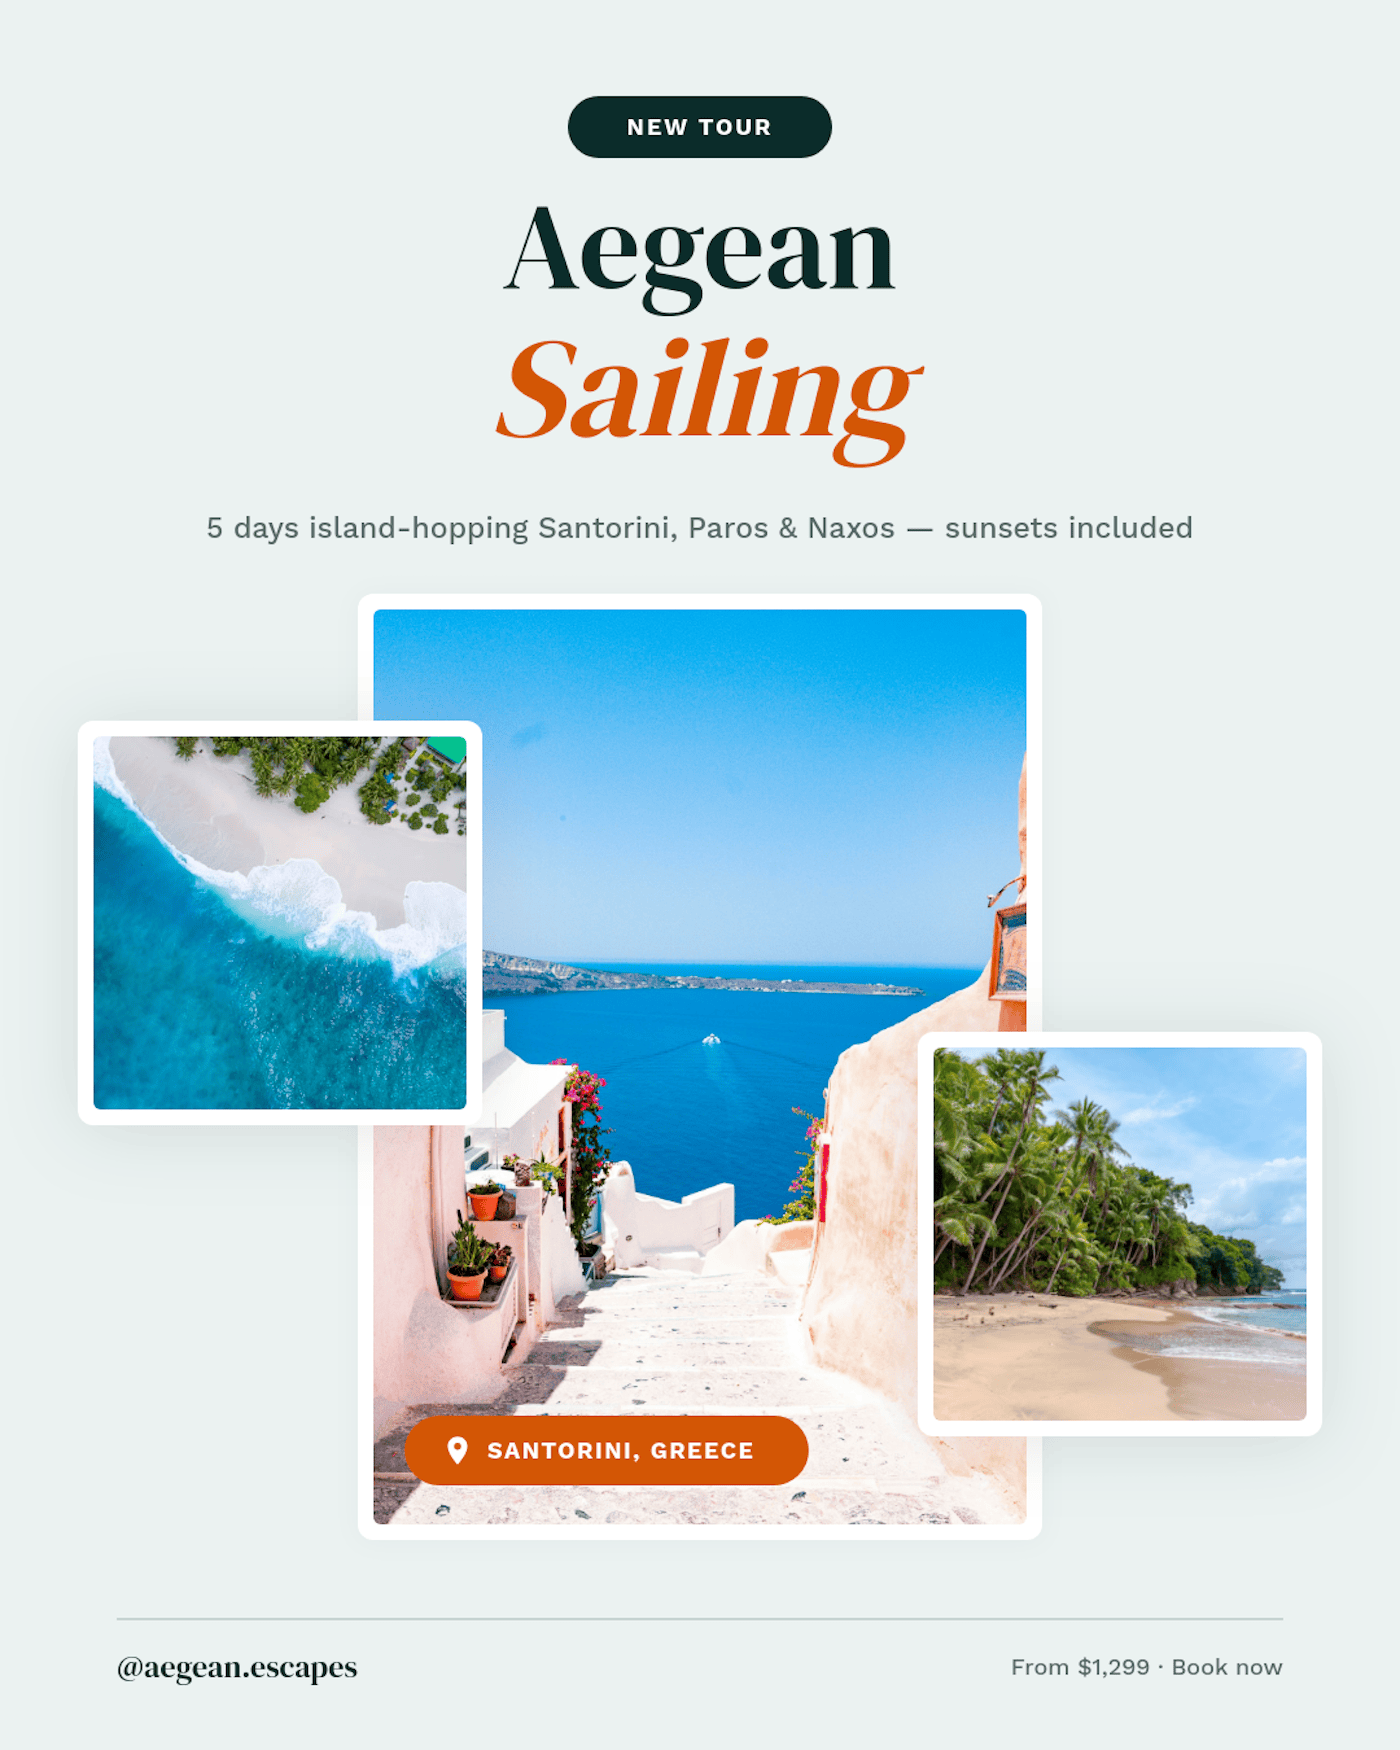
Left: the static post (PNG). Right: the same template as an animated Reel (MP4).
Why n8n needs Orshot for the visual
n8n is excellent at moving data — triggers, HTTP calls, branching, hundreds of app integrations. What it can't do is design. You can generate copy with an LLM node in one line, but a branded graphic — right font, exact headline, your colors, a logo that doesn't drift — is where most marketing workflows give up and post plain text.
You design the visual once in an Orshot template, mark the parts that change as parameters, and every run fills them in. The text stays real text, the colors stay your hex codes, and the output is pixel-identical every time. Then the same API call can publish it — so the picture never touches a human's desktop. That's the whole idea behind social media content automation: one design, every format, posted automatically.
| Node | What it does |
|---|---|
| Trigger | Fires on new data (we use a manual click; swap for Sheets/Webhook/Schedule) |
| New Tour Data | Maps your row to the template's parameters + the caption |
| Render Post Image | POST to Orshot → branded PNG |
| Render Reel Video | Same call, format: mp4 → animated MP4 |
| Publish | Adds a publish object → posts to Instagram + LinkedIn |
What you'll need
- An Orshot account and an API key (free tier = 30 credits).
- An n8n instance (Cloud or self-hosted).
- A template to render — we'll use a ready-made travel template (ID
12278), but any of the 2,000+ library templates or your own design works. - Connected social accounts in Orshot (Instagram + LinkedIn) for the publish step.
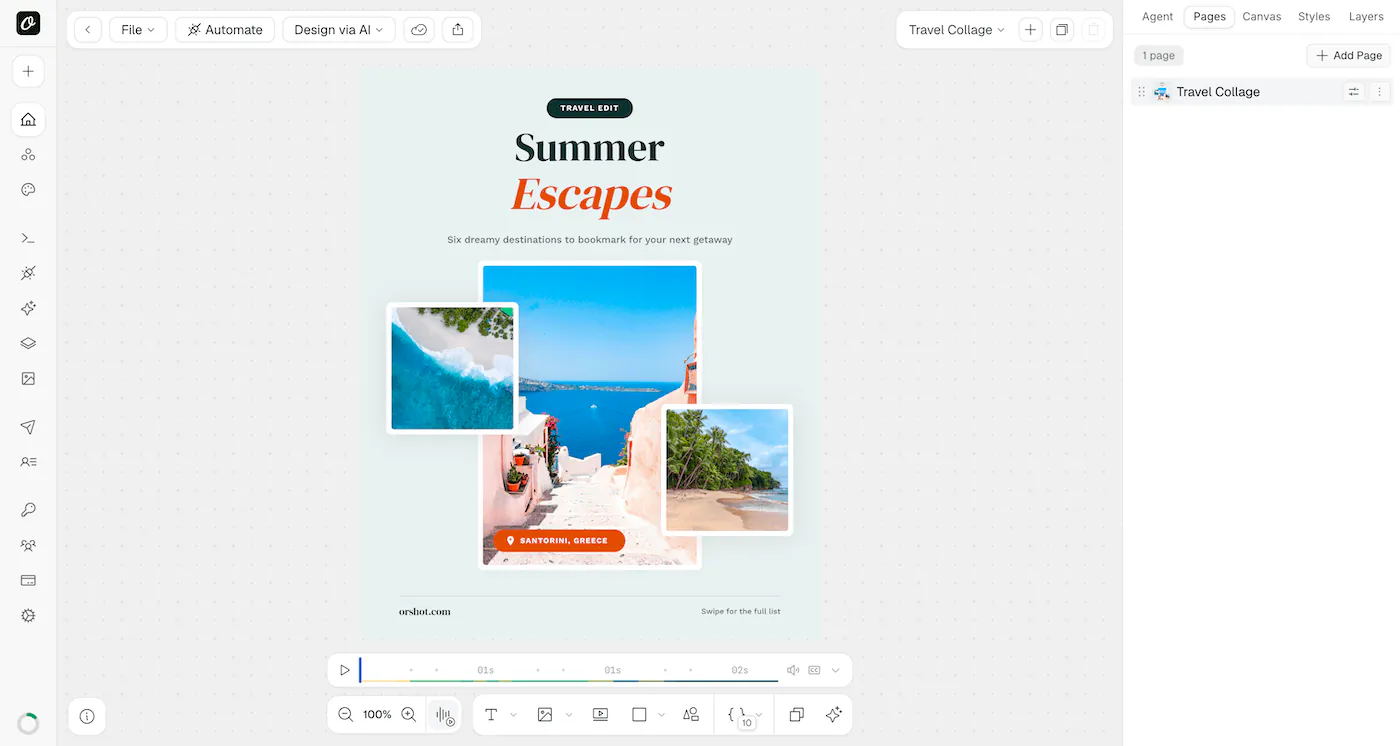
Step 1 — One template, image and video
In the Orshot Studio editor, the template is built once: a headline, a subheadline, three photo slots, a location tag, a handle, and a footer line. The layers that change per post are marked as parameters — everything else stays locked, so your brand can't drift.
This template is already animated, which is the key part: because the design has motion, the exact same template renders a static PNG or an MP4 — you only change the output format. No separate video tool, no re-design.
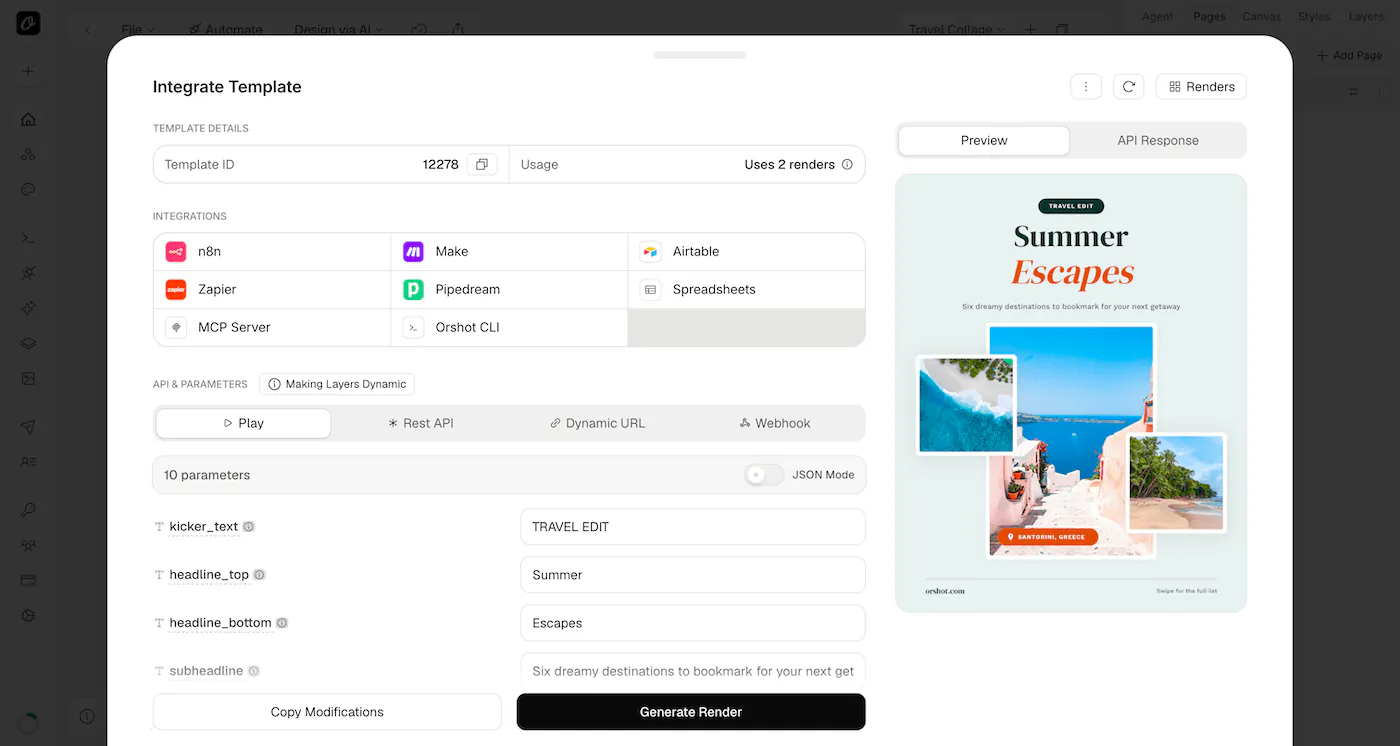
Open Automate on any template to see its parameters and the integration options. Note the Template ID and the parameter ids (headline_top, location_text, hero_image, …) — your n8n data maps onto these.
We're using a travel template here, but the workflow is template-agnostic — swap in whatever your marketing calls for: ad creatives, product banners, quote cards, OG images, multi-slide carousels, certificates. You don't have to design from scratch either: pick from 2,000+ ready-made templates in the library, generate one from a prompt with the AI Template Generator, or import an existing design from Canva or Figma. Parameterize it once and the same n8n flow drives it.
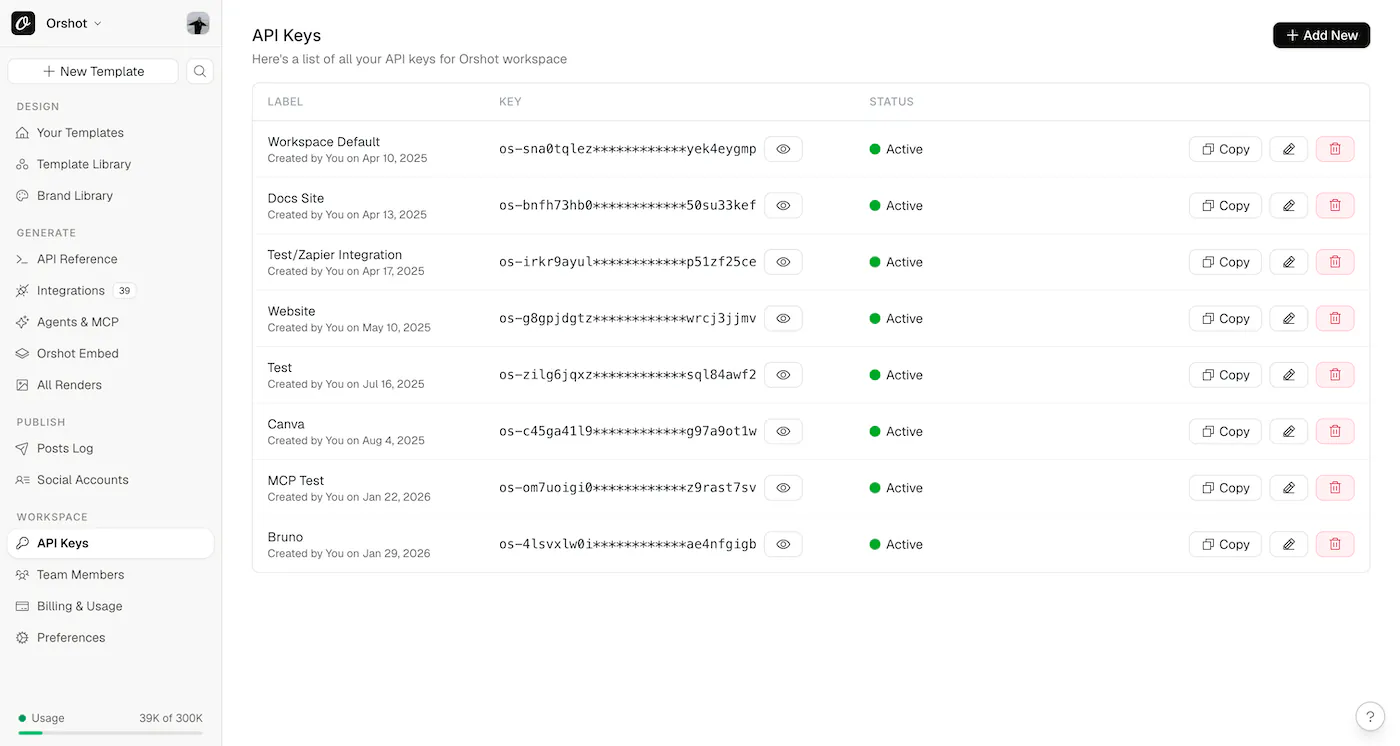
Step 2 — Grab your API key
In the Orshot dashboard, go to API Keys and copy one (or create a new one). You'll paste it into n8n in the next step.
Step 3 — Import the workflow into n8n
The fastest way to start: download the workflow JSON and import it (⋯ menu → Import from file). You'll get the full pipeline wired up:
Two nodes do the setup work:
- Run on a new tour — a Manual Trigger so you can test with one click. In production, swap it for a Google Sheets Trigger (new row), a Webhook (form/CRM), or a Schedule node. Anything that can send data works; the rest of the flow doesn't change.
- New Tour Data — an Edit Fields node holding one tour's data. Each field name matches a template parameter, plus a
captionandbooking_urlfor publishing.

In production you'd delete these literal values and map columns from your trigger instead — e.g. {{ $json.tour_name }}.
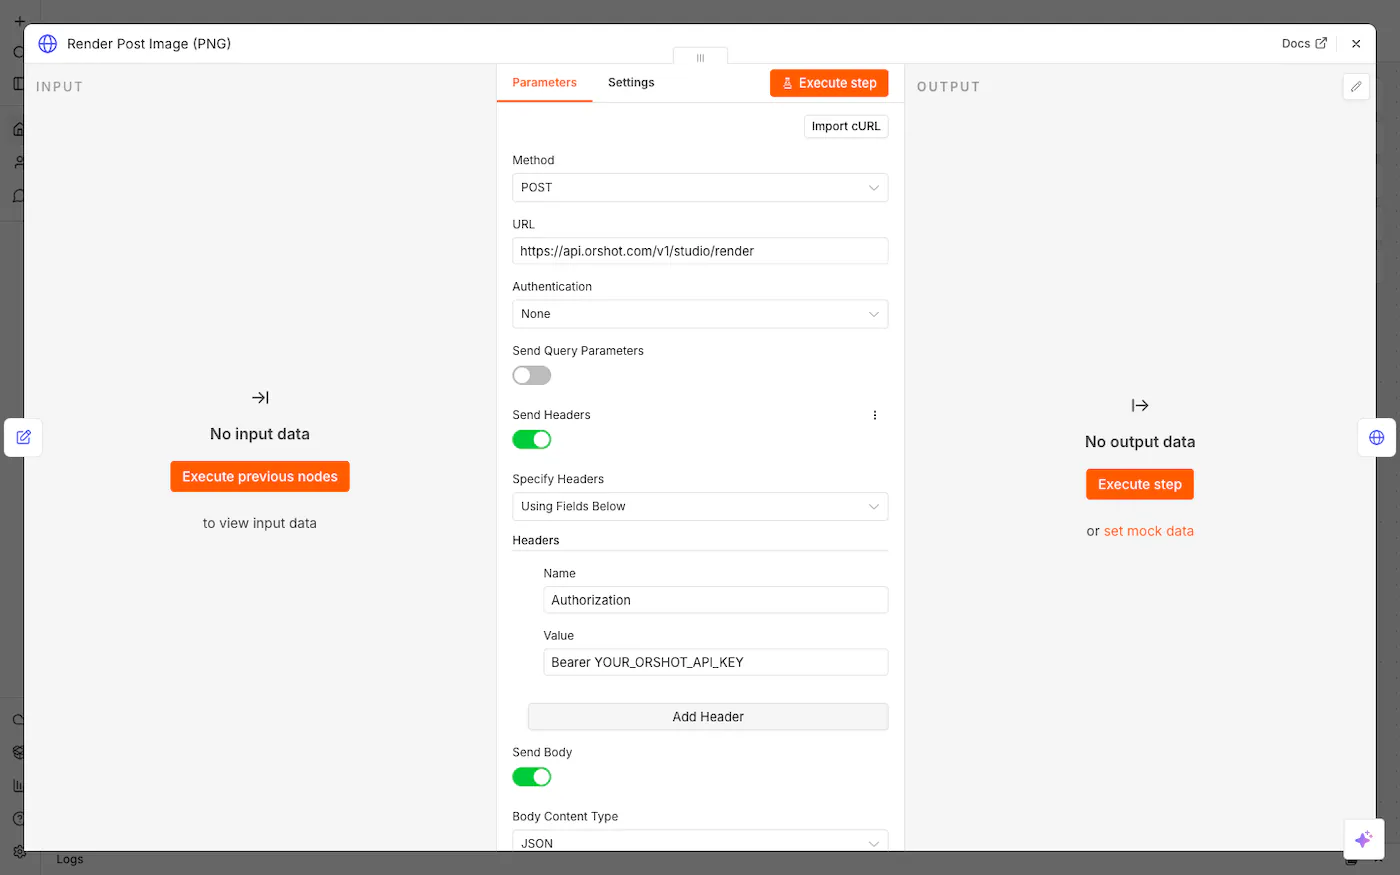
Step 4 — Render the branded image
The render node is a plain HTTP Request: POST to https://api.orshot.com/v1/studio/render, your key in the Authorization header, and a JSON body that maps the tour data onto the template.
The JSON body — note how each value pulls from the New Tour Data node:
{
  "templateId": 12278,
  "modifications": {
    "kicker_text": "{{ $json.category }}",
    "headline_top": "{{ $json.headline_top }}",
    "headline_bottom": "{{ $json.headline_bottom }}",
    "subheadline": "{{ $json.subheadline }}",
    "hero_image": "{{ $json.hero_image }}",
    "photo_two": "{{ $json.photo_two }}",
    "photo_three": "{{ $json.photo_three }}",
    "location_text": "{{ $json.location_text }}",
    "brand_handle": "{{ $json.brand_handle }}",
    "footer_note": "{{ $json.footer_note }}"
  },
  "response": { "type": "url", "format": "png" }
}
Prefer the terminal first? It's the same call:
curl -X POST https://api.orshot.com/v1/studio/render \
  -H "Authorization: Bearer YOUR_ORSHOT_API_KEY" \
  -H "Content-Type: application/json" \
  -d '{
    "templateId": 12278,
    "modifications": {
      "headline_top": "Aegean",
      "headline_bottom": "Sailing",
      "location_text": "SANTORINI, GREECE",
      "footer_note": "From $1,299 · Book now"
    },
    "response": { "type": "url", "format": "png" }
  }'
You get back a hosted PNG URL you can hand to the next node, store, or attach to a Slack message.
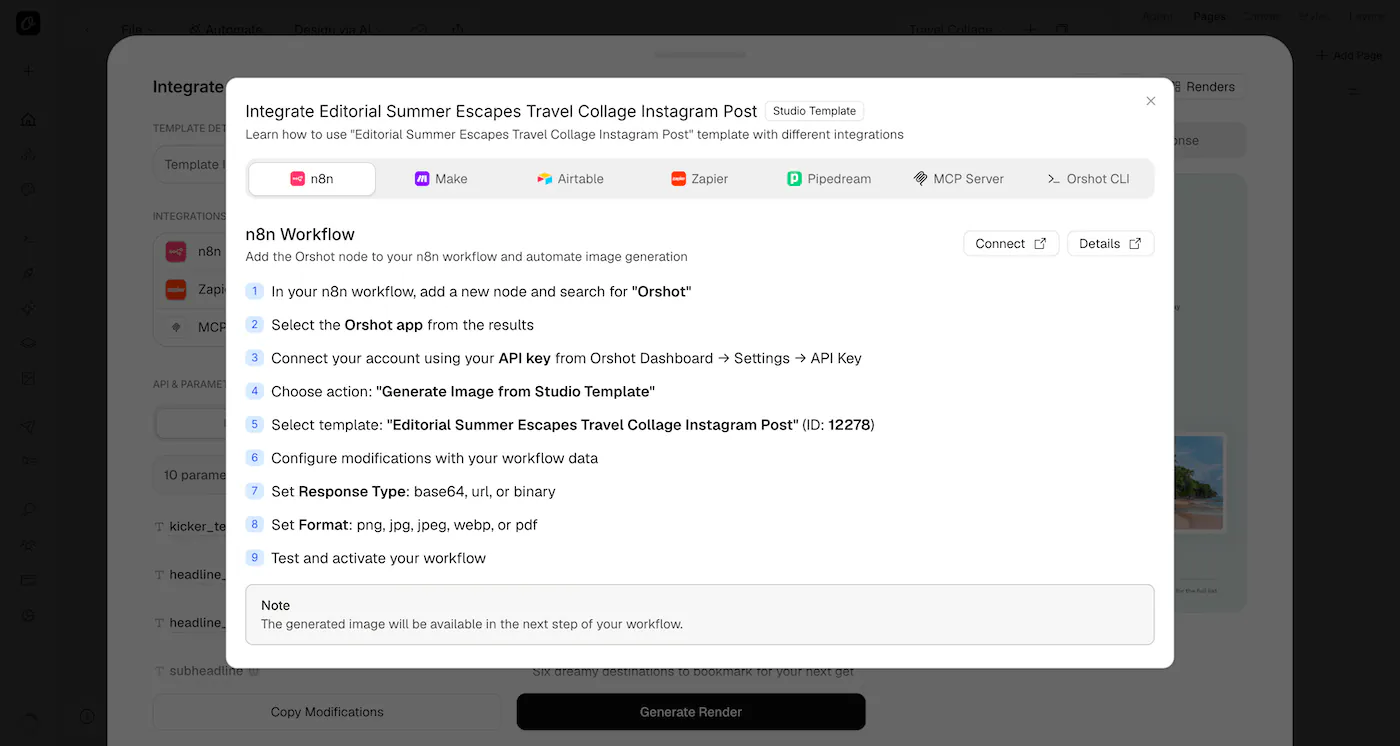
Prefer not to hand-roll the HTTP node? Orshot ships a verified n8n node — search "Orshot" in the node panel, connect your API key, pick the template, and the parameter fields populate automatically. Orshot even spells out the steps in-app:
Step 5 — Render the video from the same data
This is the part most tutorials skip. The reel is the same node, same body — one field changes:
"response": { "type": "url", "format": "mp4" }That's it. Because the template is animated, Orshot returns a ready-to-post MP4. Want to trim it or set the frame rate? Add videoOptions:
{
  "templateId": 12278,
  "modifications": { "headline_top": "Aegean", "headline_bottom": "Sailing" },
  "response": { "type": "url", "format": "mp4" },
  "videoOptions": { "duration": 6, "fps": 30 }
}
One template, two formats, zero extra design work — exactly the kind of automated image (and video) generation that's painful to do by hand and trivial to do on a schedule.
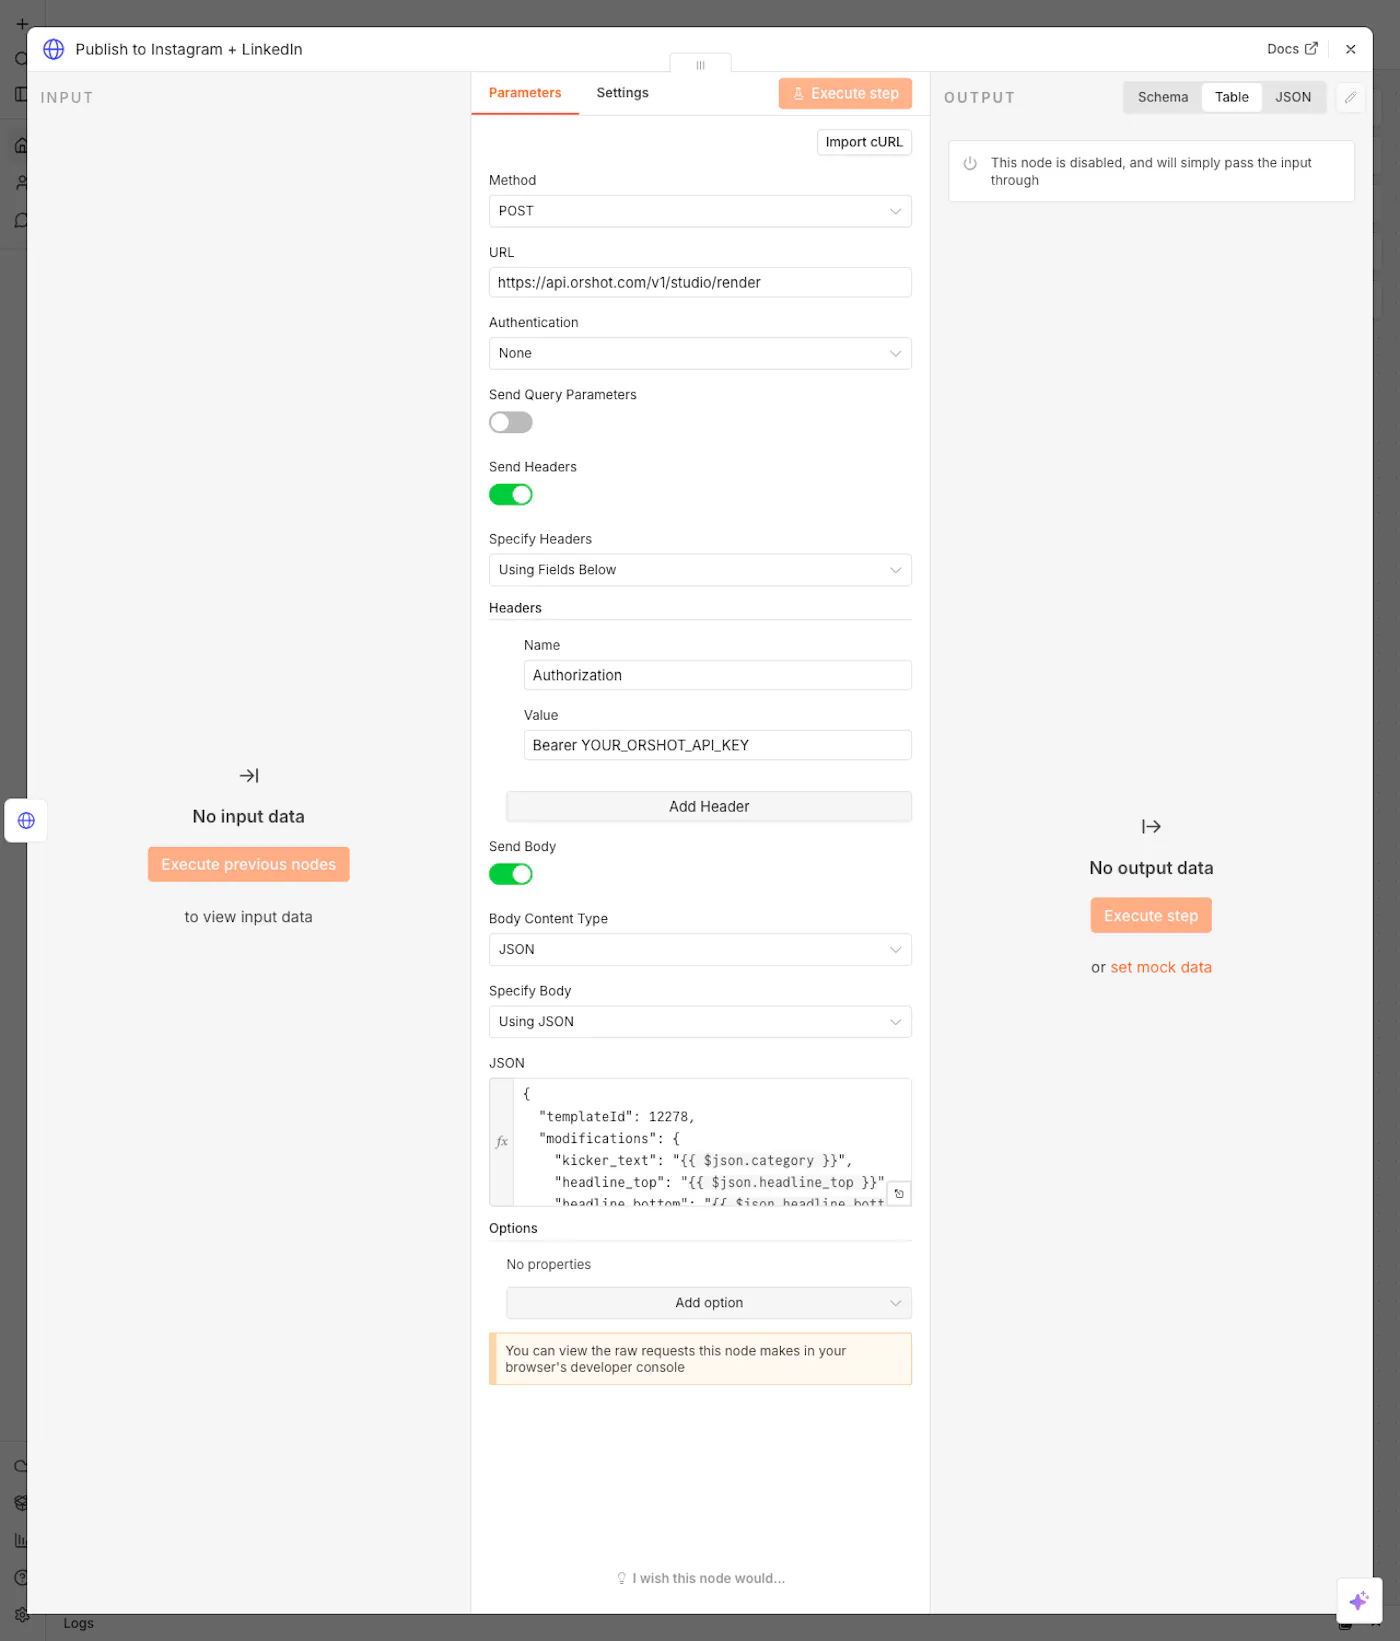
Step 6 — Publish to Instagram and LinkedIn
Here's where Orshot replaces a second tool. Instead of piping the file into Buffer or a separate scheduler, you add a publish object to the same render call and Orshot posts it for you.
First, connect your accounts in Orshot under Social Accounts and note each account's ID — that's what the workflow targets.

Then the publish node's body is your render body plus a publish block:
{
  "templateId": 12278,
  "modifications": { "headline_top": "Aegean", "headline_bottom": "Sailing" },
  "response": { "type": "url", "format": "png" },
  "publish": {
    "accounts": [19, 15],
    "content": "{{ $json.caption }}",
    "platformOptions": {
      "15": { "firstComment": "Book this tour 👉 {{ $json.booking_url }}" }
    }
  }
}accounts— the IDs from your Social Accounts page (here19= Instagram,15= LinkedIn). Replace these with your own.content— the caption used across platforms.platformOptions— per-platform tweaks. LinkedIn gets the booking link as a first comment (keeps the caption clean and the link out of the post body). Instagram uses the default caption with hashtags.
You can also isDraft: true to stage posts, or add a schedule block to post later — see the Publish docs.
Safety note: In the downloadable workflow, the Publish node is deactivated on purpose — so importing and testing never posts to your accounts by accident. n8n confirms it: "This node is disabled, and will simply pass the input through." Enable it only when your account IDs and caption are set.
Make it run on its own
Right now you click Execute workflow to test. To make it autonomous, replace the Manual Trigger:
- Google Sheets Trigger — a content calendar; each new row ships a post.
- Webhook — your CRM or a form (Tally, Typeform) fires a render the moment someone submits.
- Schedule — a daily/weekly drop from a data source.
The render and publish nodes don't change — only how the flow starts.
For the Google Sheets version there's a shortcut: it exists as a ready-made workflow inside Orshot, no n8n instance needed. One click on Use this workflow drops it into your workspace with every step already wired up.
Doing it in bulk
Rendering one post per execution is the n8n-native way and keeps things simple. But if you need to fan out — a back-catalog of 200 tours, localized variants per market — call Orshot's batch render with an array of modification sets and get them all back in one request instead of 200 executions. For volume work that's faster and cheaper than looping in the workflow.
What it costs
n8n's self-hosted edition is free (you pay for the server); n8n Cloud starts around $24/mo at the time of writing. Orshot's free tier is 30 credits with every feature unlocked, and paid plans start at $39/mo for 1,500 credits — 1 credit = 1 image, 1 PDF page, or 1 second of video. Publishing is an add-on at $12/mo per connected account, with unlimited posts.
Try Orshot Free → (30 credits, no card needed)
Bottom line: n8n handles the data; Orshot handles the design and the posting. Parameterize one template, import the workflow, point any trigger at it, and your marketing visuals — image and video — generate and publish themselves.